Friday, December 31, 2010
Thank You card from Libby
Posted by Rose-Anne at Friday, December 31, 2010 0 comments
Labels: cards
Monday, December 27, 2010
Wednesday, December 22, 2010
Crafts-Too Embossing Folder
My friend Libby gave me this embossing folder for Christmas. it is a Crafts -Too folder called Let it Snow.
The Christmas tree is a triangle and has been inked with gold Vera Color and popped up a little to give it dimension.
Posted by Rose-Anne at Wednesday, December 22, 2010 0 comments
Labels: Christmas Trees
Tuesday, December 21, 2010
ChristmasTree Card
Posted by Rose-Anne at Tuesday, December 21, 2010 0 comments
Labels: Christmas Trees
Monday, December 20, 2010
Christmas Tree
Bottle Top Christmas Tree
Here is the link to the background behind some of the cards I have made this year.
Posted by Rose-Anne at Monday, December 20, 2010 0 comments
Labels: Christmas Trees
Christmas Tree card
This is a quick and easy Christmas card made from a triangle that I drew in the post a few down. Instead of cutting up the triangle into smaller triangles i left it whole. I cut 2 triangles out and bugged them. Then glued one on a bugged card front and the other triangle I scored down the middle and glued it onto the other triangle along the creased edge. Now you have a 3D Christmas Tree.
Posted by Rose-Anne at Monday, December 20, 2010 0 comments
Labels: Christmas Trees
Libby's Card
Posted by Rose-Anne at Monday, December 20, 2010 1 comments
Labels: cardsrus
Sunday, December 19, 2010
Sharon's card
Posted by Rose-Anne at Sunday, December 19, 2010 1 comments
Labels: cardsrus
Monica's Christmas Card
Posted by Rose-Anne at Sunday, December 19, 2010 1 comments
Labels: Cards Received
Saturday, December 18, 2010
White Christmas
I think this card is self explanatory. However, to make the template I drew a triangle (isosceles). I drew the base first and then half way along the base I measured upwards how tall the tree would be and put a dot. I then joined the dot to the 2 edges of the base of the triangle. I then drew in the triangles within the triangle and numbered them and showed with an arrow which way they would go. This saves confusion and lots of time afterwards. I then redrew the triangle and cut up the pieces as templates.
I bugged several pieces of cardstock with various Christmas folders. Then I laid the templates on the bugged cardstock and cut them out. Following the guide tree I glued the triangle pieces into the correct positions to make a tree.
There are so many variations to this tree. I think I might start creating them. So keep on watching for more.
I inked the edges with gold ink and punched a gold star for the top of the tree and stuck a fold sentiment down the side.
Posted by Rose-Anne at Saturday, December 18, 2010 4 comments
Labels: cuttlebug
Wednesday, December 15, 2010
Stamped Distressed Paper Flowers
Posted by Rose-Anne at Wednesday, December 15, 2010 0 comments
Labels: Paper Flowers
Monday, December 13, 2010
Christmas Crop
Posted by Rose-Anne at Monday, December 13, 2010 0 comments
Labels: Crops and camps
Sunday, December 12, 2010
For Monica in Sweden
Posted by Rose-Anne at Sunday, December 12, 2010 1 comments
Labels: christmas decorations
Friday, December 10, 2010
Christmas Tree
 |
| This is the same tree I have every year but I have decorated it in a different way with the same decorations. It doesn't show the lights. |
Posted by Rose-Anne at Friday, December 10, 2010 0 comments
Labels: Christmas Trees
Wednesday, December 08, 2010
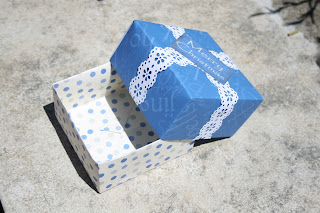
Hand Made Box
Posted by Rose-Anne at Wednesday, December 08, 2010 0 comments
Labels: box
Monday, December 06, 2010
Sunday, December 05, 2010
Card and envelope set
 |
| This is the 3D envelope I made to go with the card. The template for this envelope can be found on Mirkwood if you cannot design it yourself. |
Showing the card and the envelope. The background was done with the Sizzix embossing plate and then inked afterwards.
Products Used
Bazzill cardstock
Kaisercraft wooden stamps in 2 sizes and sentiment
SALT white cardstock for the flowers
Versa Color Ink
Kaisercraft pearls
Chrystallina Kindy Glitz.
Posted by Rose-Anne at Sunday, December 05, 2010 1 comments
Labels: Paper Flowers
Saturday, December 04, 2010
Flowers
I love taking photos of flowers and anything to do with nature. These flowers are outside Jessica's cubby house.
Posted by Rose-Anne at Saturday, December 04, 2010 0 comments
Labels: flowers
Stamped Distressed Flowers
These flowers have been made from white cardstock from SALT. Ranger Distress Ink , flower stamp and leaf stamp and Kaisercraft pearls.
I will do a tutorial soon on how to make them. I have already made quite a few and they can have as many layers as you want and can be multi coloured. These ones I have only used 1 size flower stamp. You will see in future posts that I have used 2 sized flower stamps.
Posted by Rose-Anne at Saturday, December 04, 2010 0 comments
Labels: Paper Flowers
Friday, December 03, 2010
Water Paint Distressed Flowers
 |
| Tear circles from cardstock in various sizes. I have found the thicker cardstock works best. |
 |
| Take the cardstock out of the water and re-crumble and allow to dry. This may take at least 24 hours. if you want to speed up the drying time then use your heat gun. |
 |
| When dry stack the petals (circles) on top of each other and secure in the centre with a brad, button, sewing etc. I also put Chrystallina Kindy Glitz. |
 |
| Side view to show depth. |
Posted by Rose-Anne at Friday, December 03, 2010 1 comments
Labels: tutorial
Wednesday, December 01, 2010
Box
This box can be made any size to give presents, put on the tree, decorate the table etc. Double sided patterned paper works best. When doing your measurements remember you need multiples of 3 for each folded section. eg 3cm, 3cm, 3cm ( 9cm side)
Posted by Rose-Anne at Wednesday, December 01, 2010 0 comments
Labels: box
Monday, November 29, 2010
Elissa Rose
In loving memory of my granddaughter Elissa Rose
31-5-31-5-09


