Saturday, January 23, 2010

Sizzix Hearts -2


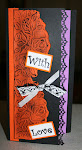
Here is another card I made using the Sizzix Heart Embossing plate and the same technique as the previous one.

Notice the paper bow at the top. I made this by cutting 3 rectangles in various proportional lengths. I folded each end towards the centre. The middle piece is another small rectangle folded over the 3 layers. There is no limit to the number of layers you put on this.

Friday, January 22, 2010

Sizzix Hearts


I used the Sizzix Heart Embossing Plate for the background.

1. Run the Sizzix Embossing Plate and Salt paper through the Cuttlebug.
2. Rub purple and blue Oil pastel over the entire card.
3. Lightly paint on Gesso over the top.
4. While still wet rub as much Gesso off as you can. Then let dry.
5. Cut 4 long rectangular pieces of patterned paper and fold each end up to the centre.
6. Using an awl poke a hole through all layers of petals and add a brad.
7. Brad to the embossed card.
8. Using Crafter's Workshop Templates and Kindy Glitz, make flourishes where desired.
9. Stamp a sentiment and adhere to the card.

Thursday, January 21, 2010

Cuttlebug Wrapping Paper Card


My sister-in-law has just had an operation so I made her this card using wrapping paper I received around a present. It bugs and sands nicely.

Wednesday, January 20, 2010

Spellbinders Butterflies


Another fun card to make with shapes and butterflies. I chose these colours because it reminded me of the colour combinations of the 1970s. I wore purple pants with a red top over them. Have you noticed this shape is the same as the previous card but flat.

1. After cutting out the smaller shape, run it through the Cuttlebug.
2. Ink the edges with Vintage Versafine Ink.
3. Using Gel Medium stick the 2 shapes together.
4. Draw freehand lines around the shapes.
5. Cut and emboss the Spellbinders, Shapeabilities Butterflies.
6. Stamp a sentiment on cardstock and ink around the edges.
7. Using Kaisercraft foam adhere the sentiment to the card.
8. Glue the Butterflies along their bodies and adhere to the card.
9. Fold the wings so they look like they are 3 D.

Tuesday, January 19, 2010

Spellbinders and Cuttlebugged card


The card is made from a template and folded in half. I have used SALT cardstock.

1.Cuttlebug half the card vertically and then horizontally.
2. Ink it with Vintage Versafine Ink.
3. Ink the EK Success border and adhere.
4.Cut and emboss the Spellbinders Heart Die and ink.
5. Pop the die cut onto another piece of cardstock and adhere to card.
6. Stamp with a foam sentiment onto cardstock, ink and adhere.
This card can be given on Valentine's Day or just as a sentiment card.

Monday, January 18, 2010

Cuttlebugged Plastic Plates.


I have a heap of white plastic plates left over from a party. So I thought about putting them through the Cuttlebug. They worked.

1. I punched 6 flowers from these sturdy plastic plates.
2. Ran the flowers through the Cuttlebug .
3. Inked them with Pumpkin Staz On Ink.
4. Layered them.
5. Put a brad through the two flowers.
6. Bent and folded each of the top petals.
7. Adhered them to a bugged metallic cardstock that has been lightly sanded.
8. The foam unknown source sentiment was stamped onto SALT cardstock.
9. The sentiment cardstock was sanded using Tim Holtz Distress tool.
What I like mostly about this medium is it bends and folds easily and stays in that position.

Spellbinders Heart Card


Anybody who knows me knows I love texture, shapes and flowers. Well, I also love hearts and the list goes on. With Christmas over and Valentine's day looming I thought I would make some love cards which can be given on any occasion if you are not into Valentines.

1.I used my Cuttlebug and ran the Spellbinders heart through it.
2.I then inked the cut out image with Vintage Versafine ink.
3.The blue background has been run through the Cuttlebug with the hearts embossing folder. 4.The heart border was punched using an EK Success border punch.
5.The heart has been popped up using foam from Kaisercraft.
6.The bow is recycled from a box of chocolates.

Sunday, January 17, 2010

Stockton Beach


Melanie and I in the sand dunes at Stockton Beach. 8th January 2010.

Saturday, January 16, 2010

Sunflowers


These were also taken in Melanie's garden on Christmas Day. I love sunflowers and am very happy with how these photos turned out. I am happy with my photography here. I have taken all photos.

Flowers

I took this photo on Christmas Day at Melanie's. It was in her garden. The white sky did the photo justice and it looks fantastic.I love the transparency of the petals.

Wednesday, January 06, 2010

Thank you Flowers


These flowers were given to me by my ex practical student to thank me for the good report I gave her that landed her a permanent position in a high school. What a lovely thought.

Tuesday, January 05, 2010

Dorothy's Card


This is the card Dorothy made me for Christmas.

Monday, January 04, 2010

Margaret's Card


This is the card Margaret made me for Christmas.

Sunday, January 03, 2010

Carol J's Card


This lovely card was made for me by Carol J.

Saturday, January 02, 2010

Sharon's Card


This lovely card was made for me by Sharon.

Friday, January 01, 2010

Libby's Card


This lovely card was made for me by Libby.

Elissa Rose

In loving memory of my granddaughter Elissa Rose
31-5-31-5-09