|
| Jessica and Chloe at Crestwood Park |
 |
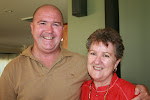
| Jessica and I |
 |
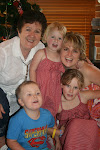
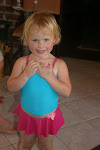
| Jessica, Chloe and I.
I love my 2 granddaughters. This outfit that Jessica has on is what I bought for her last weekend. I took the 2 girls shopping and they bout 3 items each. It was so much fun.
|


|
| Jessica and Chloe at Crestwood Park |
|
| Jessica and I |
|
| Jessica, Chloe and I.
I love my 2 granddaughters. This outfit that Jessica has on is what I bought for her last weekend. I took the 2 girls shopping and they bout 3 items each. It was so much fun.
|
 |
| A double fold at the bottom showing the underneath paper. |
 |
| Showing the template made to cut out the red cardstock. |
 |
| Fold any size card you wish to make and adhere patterned paper to the front. |
 |
| Chose which corner you want to turn over to make a triangle. |
 |
| Make templates 1cm smaller than the underneath triangle and cut the cardstock and paper the relevant size. |
 |
| Adhere the triangles tot he folded triangle. |
 |
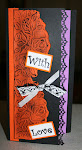
| Christmas wishes to chose from that have been printed from the computer. |
 |
| Adhere the sentiment, attach the Kaisercraft bling and you have a card. HINT The bow of bling was cut away from a Kaisercraft bling present. |
 |
| Cooper sitting in line at the beginning. Everybody else was facing the stage but not our Cooper. |
 |
| Cooper proudly displaying his white merit award that required 3 green awards to achieve. He is very proud of his achievements.
Cooper's class ran the assembly yesterday and the class also sang Yellow Submarine. He was so expressive and really got into the song. I had to smile. He also used the microphone to thank everybody for coming. What a great effort the year 1s did.
|
 |
| Most of the products used here are Kaisercraft. The paper is from an old range. |
 |
| Close up of where to put the Kaisercraft bling and the handmade flower. |
 |
| This card was mainly made using Twig and Berry paper from Kaisercraft. The bling was also from Kaisercraft. |
 |
| Close up showing the title that was printed from a word document I did on the computer because my stamps are somewhere safe and I have no idea where they are in this house because we have just moved. HINT
The bling is from a Kaisercraft Christmas bling shape. I used part of it on another card and then I cut up the strips and stuck them on this card and I also cut away single bits of bling from the same shape.
|

 |
The construction of the card |
 |
| The finished card |
 |
| Inside the card |
 |
| I gave year 12 a party and presentation. |
 |
| The present year 12 gave me. |


 |
| This is my precious family taken at Berowra Waters on my birthday. I chose to have my birthday with family here and we had a picnic. It was a beautiful sunny day and I enjoyed myself. |
 |
| The group of ladies who attended the camp. |
 |
| Melanie and Rose-Anne the camp hosts.
This year the camp theme was blue and the best decorated hat. Blue because we sold raffle tickets for Beyond Blue.
As always we all had a fabulous time and accomplished lots of work. Melanie did most of the cooking and I did most of the organising and lessons.
|