Wednesday, November 14, 2012

Diorama Christmas Card


The final Diorama Card.
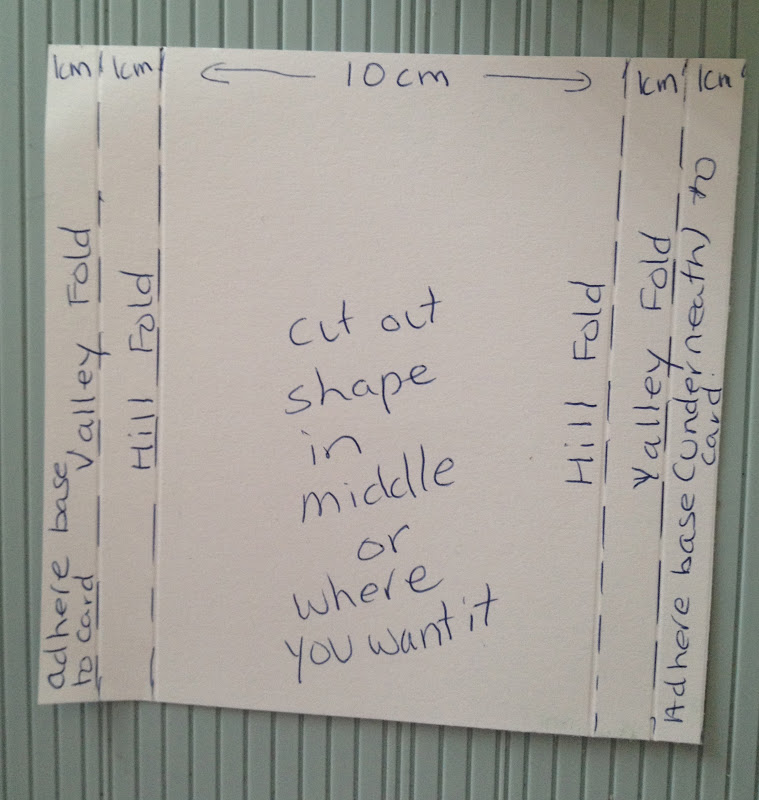
Cut a piece of cardstock the measurements shown above. Score the lines and fold either valley or hill. Then   using a Cuttlebug and a folder put the middle panel through the Cuttlebug.

Ink the embossed image plus parts of the cardstock. This was Evergreen Versa Color. The embossing folder I used here was one by Bringing Crafts-Too you.

Cut out the middle panel.

Showing the folds and the baubles that have been inked and cut out by hand from a Cuttlebug embossed piece of cardstock. Also the sentiments from a printed font from the computer have been adhered to the card.

Adhere the folded panel to a card base that measures 30cm x15cm. In this case I didn't  fold it exactly in the middle. I allowed a side piece from the back to show through.

Adhere red Basic Grey pieces of patterned paper over the adhered  edges of the raised panel.

Adhere the same Basic Grey paper to the inside of the card that shows through down the right hand side edge.

Ink over the green embossed card with Gold to give it a filigree  effect. Add Basic Grey strips over the red paper so only hints of red show through.
See the top card to see the end result.

Pop Up Christmas Card

I have used 2 Embossing folders here. The gold one is a frame that I cut the side and used as a section.I also sanded the gold cardstock. The black cardstock has been embossed and inked in gold.

The inside of the card shows the sentiment that is a Sizzix embossing folder that has been sanded after embossed. The stars are cut out from the embossing sheet of stars and inked.


Tuesday, November 13, 2012

Pop Up Merry Christmas


The holly has been cut out using a Holly Sizzix die and the Cuttlebug. Then inked.

Monday, November 12, 2012

Pop Up Christmas card

Basic grey and the Cuttlebug again. The trees  are cut using the Cuttlebug and a Cuttlebug die then embossed with the Cuttlebug and folder. The sentiment is a computer printed font.

The stars have been embossed using the Cuttlebug and folder. I cut the starts out individually . The sentiment is a Sizzix embossing plate.

Sunday, November 11, 2012

Pop Up Card-Happy Christmas

Once again Basic Grey and the Cuttlebug. The Christmas Tree was cut and embossed using Bazzill Cardstock and the Cuttlebug.

The sentiment was printed from the computer and the bauble was cut using the Cuttlebug and embossed. All 3 have popped out when the card is open.

Saturday, November 10, 2012

Pop up Christmas Card

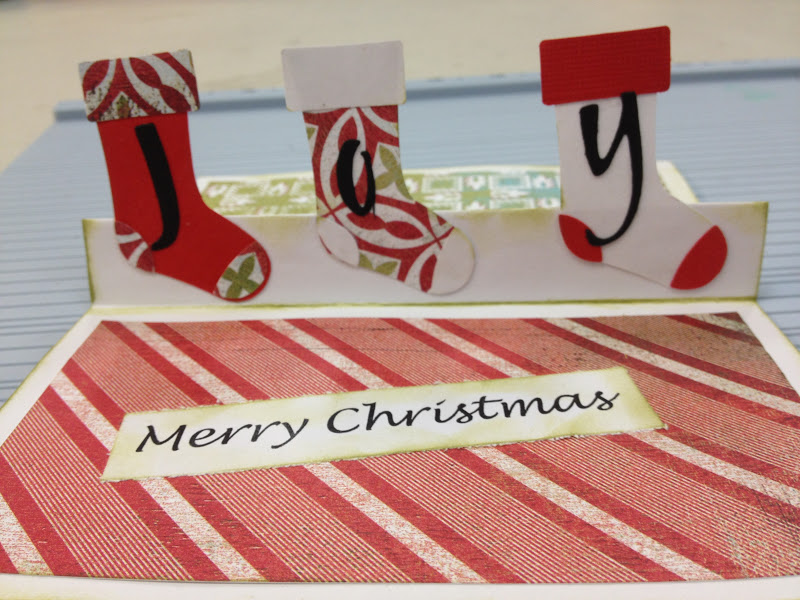
Basic Grey papers, Joy was cut using Sizzlits  alphabet Boxed Brushed. I used the Cuttlebug to cut the JOY word using the Sizzlts die.


Front of the Card.

Friday, November 09, 2012

Sizzix Reindeer #2

This shows the 2 types of materials I used. The top one is gold cardstock which has a white background. So when I sanded the raised embossing it ended up white. The other reindeer has been done on chipboard which has been inked.

Close up of the gold cardstock which has been sanded.

Close up of the white chipboard that has been inked.

Thursday, November 08, 2012

Pop Up Christmas Bauble Card

Basic Grey patterned paper that has been Cuttlebugged. 

The baubles have been punched and embossed and inked then adhered to the centre panel that pops up.

Close up of the baubles that are embossed using the Cuttlebug.

Wednesday, November 07, 2012

Pop up Card Tutorial

Cut a piece of cardstock or double sided patterned paper into a rectangle of your chosen size.

Fold in half and crease firmly.

Fold both layers of the cardstock up along the fold line edge. This length is determined by what you want to adhere to the folded piece. Crease firmly.

Turn the card inside out and crease firmly.

Adhere the open edges at the fold edge together so the  card id adhered shut along the spine.

This is what the card will look like when opened .

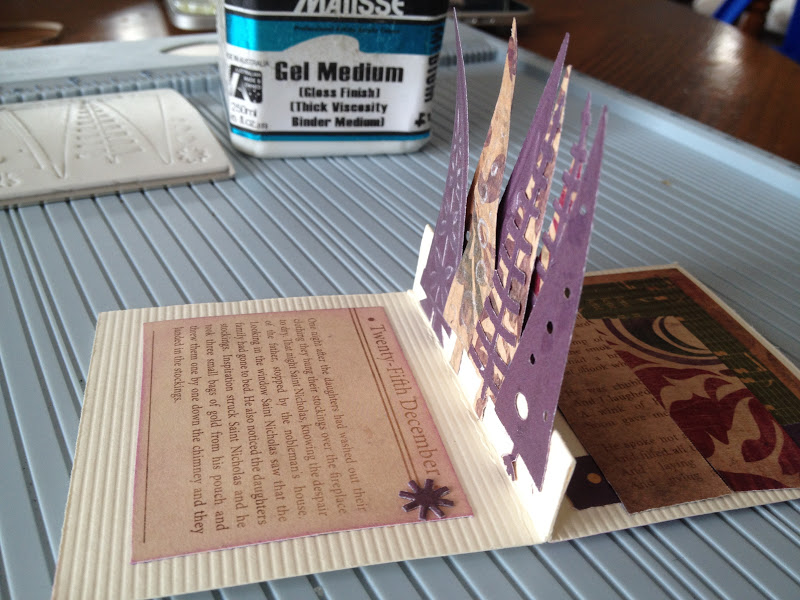
Decorate the folded flap with any decorations  or words. The Flap can also have sentiments adhered to it . These trees were cut out with the Cuttlebug and then embossed with it. I lightly sanded the embossed trees to show dimension.

Showing the products used.

Side view when open.

Star Pop Up Card

The chipboard stars were cut with the Sizzix machine and chipboard.I used Gel medium to glue the chipboard stars to the pop up strip. The sentiments were printed from the computer.

This new Christmas ribbon is so nice and firm . 

Tuesday, November 06, 2012

Pop Up Christmas Card

The outside of the card. I used Kaisercraft Peppermint Twist  papers plus Kaisercraft bling.

The inside of the card showing the Cuttlebugged Christmas trees that pop up. The 2 lime green trees were cut freehand by me. The other 2 are from a Sizzix range and I cut around them freehand. I also inked the smaller trees.
Once again Kaisercraft papers and computer printed sentiment.

Close up

I love Christmas and I love making Christmas cards. I have made and designed these past 2 cards on my posts myself. I have another one tomorrow to share. I will in the meantime do a tutorial on how to make them. You will be amazed at how easy they are.

Monday, November 05, 2012

Sizzix Reindeer

Pop up Reindeer card. The sentiment was written in word and printed and the paper is Kaisercraft. The cardstock is from SALT.

Close up of the embossed reindeer.

Reindeer pop up card shut. This shows the new Peppermint  Twist paper from Kaisercraft and the bling on the front of the card.

I love the new Sizzix die and embossing folder of the reindeer. It is so easy to use and looks great. 
The sandwich I used in the Cuttlebug for the die was the B plate, cardstock/chipboard, Sizzix die, B plate. I ran this combination through the BUG and it cut perfectly. I then embossed it with the normal sandwich.

Sunday, November 04, 2012

Chloe turns 5

Chloe and Cooper at the party.

This is the clown puppet that Cooper made at Chloe's birthday yesterday.


Triangle Fold Card

I have used an old Kaisercraft Christmas Paper called Dear Santa Collection. I used 3 different ones called Train Set, Billy Cart and Pony.

I used Spellbinders Classic Scallop Circles and my Cuttlebug to do the circles.

Opened up showing all the papers used. The pearls are Kaisercraft pearls.

This card was so much fun to do. I should have thought before I glued with Gel Medium because the inside wish is upside down when you open the card when the sentiment on the front is facing the correct way when reading it. Live and learn.

I have no idea where I got this idea from but it is on the net somewhere. Google Triangle Fold Card and you will find all sorts of links to other blogs and even You Tube that will show you how to make them. I found these after I had made my triangles and folded the card.

Elissa Rose

In loving memory of my granddaughter Elissa Rose
31-5-31-5-09