Wednesday, January 12, 2011

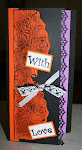
Cuttlebugging long strips

Cut a strip of patterned paper the length of the cardstock.

Fold the strip in half and then run it through the Cuttlebug. Yes one part will be raised and the other indented but the next step camouflages the difference.

Sand the patterned paper and this camouflages the difference in the bugged areas.

This scrapbook page is now ready to put photos etc on.

Tuesday, January 11, 2011

Recycled cards

Here is another card I have recycled. It looks better in real life. The Chrystallina Kindy Glitz looks green in this but in real life it looks silver.

Monday, January 10, 2011

Close ups of Jessica's cards


Sunday, January 09, 2011

Jessica's Cuttlebug Cards


Jessica made all these cards with me using the Cuttlebug and oil pastels and chalk. I put the cardstock through the Cuttlebug and jessica decorated them the way she wanted. We took them outside and sprayed them with hairspray so the chalk and crayon would not come off. We had a lot of fun.

Recycled Christmas Cards


Instead of throwing away those commercial cards, recycle them using the Cuttlebug and you have a new card to send the following year.
Method
1. I cut off the front of the commercial card and bugged it. 
2. Then sanded it.
3. Attached some ribbon on the top with a bow.
4. Stick it down on a hand made card. I used almost an A3 piece of cardstock.
5.a sentiment to a piece of the off cut and pop it up on the card.
6. I have put Chrystallina Kindy Glitz on the baubles on the tree.

Monday, January 03, 2011

Blue and Green Swap for Cards-r-us.


I love using flower stamps and cutting them out and creasing them and inking them. Then layering them.

Margaret Ashby's Christmas Card

This is the lovely card Margaret Ashby sent me for Christmas. I love the texture and the colours.

Friday, December 31, 2010

Thank You card from Libby

This is the beautiful Thank You card Libby sent to me after she attended my camp. How beautiful and thoughtful.

Monday, December 27, 2010

Carol's Card


Melanie and Rose-Anne

This photo was taken on Christmas Day of Melanie and I.

Wednesday, December 22, 2010

Crafts-Too Embossing Folder


My friend Libby gave me this embossing folder for Christmas. it is a Crafts -Too folder called Let it Snow.
The Christmas tree is a triangle and has been inked with gold Vera Color and popped up a little to give it dimension.

Tuesday, December 21, 2010

ChristmasTree Card


This card was made using the same triangle as the cards before.
The background paper is the wrapping paper I have used this year for our Christmas presents. I bugged it, cut it to shape, sanded it and then glued it to the cardstock.
The Christmas tree is made from metallic cardstock. I cut it to shape, bugged it , scored it and glued it to the paper down the score line. 

Monday, December 20, 2010

Christmas Tree

Bottle Top Christmas Tree
Here is the link to the background behind some of the cards I have made this year.

Christmas Tree card


This is a quick and easy Christmas card made from a triangle that I drew in the post a few down. Instead of cutting up the triangle into smaller triangles i left it whole. I cut 2 triangles out and bugged them. Then glued one on a bugged card front and the other triangle I scored down the middle and glued it onto the other triangle along the creased edge. Now you have a 3D Christmas Tree.

Libby's Card

This is the lovely Christmas card Libby sent me. I received it in the mail this week. It is so nice. Thank you Libby for making me feel special.

Sunday, December 19, 2010

Sharon's card

This is the card Sharon sent me for Christmas. I love the textured background. Thank you Sharon for making me feel special.

Monica's Christmas Card

This lovely Christmas card was made by Monica. It shows her excellent photography. Thank you Monica for your lovely card and I too am pleased you got into blogging as I love your blog and I love looking at all the Swedish things and photos plus your life.

Saturday, December 18, 2010

White Christmas


I think this card is self explanatory. However, to make the template I drew a triangle (isosceles). I drew the base first and then half way along the base I measured upwards how tall the tree would be and put a dot. I then joined the dot to the 2 edges of the base of the triangle. I then drew in the triangles within the triangle and numbered them and showed with an arrow which way they would go. This saves confusion and lots of time afterwards.  I then redrew the triangle and cut up the pieces as templates.
I bugged several pieces of cardstock with various Christmas folders. Then I laid the templates on the bugged cardstock and cut them out. Following the guide tree I glued the triangle pieces into the correct positions to make a tree.
There are so many variations to this tree. I think I might start creating them. So keep on watching for more.
I inked the edges with gold ink and punched a gold star for the top of the tree and stuck a fold sentiment down the side.

Wednesday, December 15, 2010

Stamped Distressed Paper Flowers

Here are some different coloured stamped distressed paper flowers I did at my crop on Friday night.

Monday, December 13, 2010

Christmas Crop

Here I am about to give out the Christmas presents at our monthly crop at Beaumont Hills. We all put in a present and got a present in return. It was so much fun. We also had a nice meal that we all supplied.

Elissa Rose

In loving memory of my granddaughter Elissa Rose
31-5-31-5-09