Sunday, December 07, 2008

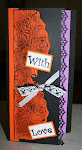
Cuttlebug Folding


I don't know if this has been done, I am sure it has but I
folded the metallic cardstock before putting it through the bug.I then sanded it and you get part of the page indented and part raised.
I can see many possibilities with this.

Saturday, December 06, 2008

Button Christmas Tree


Fabric and anything that is to do with it is my other love that I don't get a lot of time to do these days. Here is a button Christmas Tree I designed and made from some of my button collection. I love buttons.
Notice above the button tree is another tree. It is a 3D one that I sewed and stuffed.

Cuttlebug Pink Double Embossed Serviette Card.


I did this a different way to the previous cards. I glued the serviette to the cardstock first and then put it through the Cuttlebug when it was dry. I then inked it. Noticed i used 2 folders here-The Christmas words and the Swiss Dot Border.
When you Cuttlebug the serviette after it has been glued onto the cardstock, the embossing is more pronounced. if you want it to be more subtle, then you bug the chipboard or cardstock first before you put the serviette on.

Cuttlebug Pink Word Serviette Card


I did this the same way as the previous card on cardstock. I used the word Christmas Cuttlebug Folder and inked the top to bring out the words.

Cuttlebug Merry Christmas Serviette Card


Here is another serviette card made from the same pink bauble serviette. Instead of putting it on chipboard it is glued onto cardstock,

I put the cardstock through the bug first and then glued and pressed the serviette onto the raised bits. When

the glue dried I inked and then put Crystallina Kindy Glitz over the top of the lines of the baubles and the other bauble.

Cuttlebug Red Bauble Serviette Card.


Here is another serviette I bought from the same cheap shop.This was done the same way as the previous card.
By inking over the top it brings out the embossing underneath the serviette and it also adds colour and interest.

Cuttlebug Serviette Bauble


I bought the serviettes from a discount shop for $1.50.They were baubles to begin with.
I put the round chipboard from SALT through the Cuttlebug. I then glued the serviette bauble with GEL MEDIUM over the top and pressed it into the embossing. Then I inked over the top and around the edges when the ink was dry. Merry Christmas was already on the serviette so I didn't have to stamp.

Friday, December 05, 2008

Cuttlebug Quick and Easy


This card certainly is a quick an easy one. I just stuck the pre-bought tag, which already has the silver mat behind it on the card . I embossed some silver card with the border folder and stuck that on the present. Ties some fibre in the hole instead of the tacky string it came with. The Basic Grey patterned paper I put through the Swiss Dots. There you have it.
NOW IT'S BACK TO HOUSE WORK!!!!!!!

Today

Today is friday and my day off work. I have been cooking Rocky Road, Christmas fruit cake and baked Cheese cake. So I have been busy. In between I have been getting onto here to have a break from it all.

So LIBBY while your at work the scrapper come card maker will play. LOL.

Cuttlebug Tag with 2 folders


This card is another of the square quick and easies that I find great especially with an impatient person like me who gets an idea in her head and wants to make a card in 5 minutes.
ARE YOU THE SAME?????
This bauble tag was pre-bought all I did was bug it with one folder and sand. Then the word joy was bugged from the words Christmas folder onto SALT silver cardstock and the word cut out. and sanded. The berries on the Holly are Kaiser pearls.

Cuttlebug Double Embossing


This card is another of my quick and easy ones that i have bugged the pre-bought tag with the Cuttlebug twice. Top and bottom. I wanted the words to stand out. I also sanded the raised bits to rub off some red to make it 2 toned.
The pearls are Kaiser.

Cooper and the Reindeer


Nothing is sacred in my house anymore with a little boy around. He does make me laugh.The joy on his face last weekend when I was putting the decorations up was delightful. Everything was WOW! When he saw the reindeers he grabbed them and began hopping on their all over the place and laughing. Normally I would grabbed them off him but he was so cute. However, when he became rough I tried to get them off him.
He kept saying "MINE, MINE"
We need these funny things in our lives to lighten the load.

My Front Yard


I always love the garden after a downpour. Everything is fresh and looks shiny. This is part of my front yard. Notice the Jacaranda and the agapanthas. At the moment my front yard is green, white and purple.
You can see the rainbow in the top right corner.

I can see a Rainbow


Brian and I often sit on our front balcony and have a glass of wine in summer. This was the view last Saturday after a big downpour. It was a double rainbow and it looked so nice and refreshing.
There is nothing more beautiful than nature-God's creations are a marvel.
Do you notice the writing????????

Thursday, December 04, 2008

A Folk Arted Candle Holder


Here is a Christmas Decoration I Folk Arted several years ago. I love the Angels. By the way, I also made the light shade.

And another candle holder I also folk arted. I love bears. I also decoupaged the candle.

Cuttlebug Altered Red Tag Card


Another of the same style cards.With a different foolder. I ran the tag rhrough the Christmas Tree Folder.
What i like about these tags is you don't have to stamp Merry Christmas.

Cuttlebug Altered Tag and Swiss Dots


This card is also made from a square and not folded in the centre. I ran the red tag through
the Cuttlebug and then sanded it to get the white dots to match the white dots on the border of the card.

Cuttlebug Poppy Red Emboss


Once again this card was done the same way as the previous 2 but I used Poppy Red Emboss dual pens. I also ran kindy glitz along the zig zag. The red pearls are Kaiser.

Cuttlebug Impress Olive Green


This card was made much the same way as the previous one. I used the embossing border and sanded and ran the Olive Green Impress Dual Marker down the

grooves. I put a Kaiser bling where the 2 lines met.

The border on the card was done the same way and out of SALT silver metallic cardstock.

I had some bits left over from the Christmas word folder and I cut out the large and small star and put on the top and bottom.

Cuttlebug Indigo Blue Emboss Card


Cuttlebug and Navy Embossing Pen


This is a very simple card but looks detailed. I began with a square and didn't fold it in the centre but over one side. The little bauble card is a pre-bought one that I ran through the Cuttlebug with a border. I sanded it and then used my Indigo Blue Emboss Pen to highlight the border.The other dots are done from the border also on the Cuttlebug.

Wednesday, December 03, 2008

Thrilled to Bits at this.

Girls if you are reading my blog, check out what was said about me on this blog. I am thrilled to bits that this was written.

I love to create and I have been inspired by so many lovely ladies and their blogs. I like to give back a little of what I have received and that is inspiration and ideas.

I am always thinking and designing and love to create.

PLease leave comments if you are reading my blog as I love to get them and know what you think.


http://amosteam.com/scrapblog/?p=179

Cuttlebug Christmas Cards


Here are a few cards in a series of Cuttlebug Christmas Cards i have designed and made from a square piece of Bazzill cardstock. They have all sorts of Cuttlebug techniques and I will share a few of them at a time.They were so much fun to do and so quick and easy.

Cuttlebug Altered Bauble


The bauble has been bugged with part of the bauble embossing folder. and sanded so the area around the "ForYou" stands out.
The Holly Berries are Kaiser Pearls.

Christmas Trees


I put my Christmas tree up on 1st december. This is a tradition as I have done it ever since I can remember.

I have included 2 of the trees I have painted and folk arted several years ago. I love Christmas Decorations.

Tuesday, December 02, 2008

Christmas Bauble


These 2 baubles of different sizes were made out of chipboard and patterned paper.You cut 3 circles out of the same size and score them down the diagonal. Cover them on one side with patterned paper. Then glue half of the circle to half of the next to half of the next. Decorate with ribbon etc anyway you want and you have neat little decoration for your tree etc.

Cuttlebug Altered Pink Card close up.


This shows you the heart embossing folder I embossed on the bauble. It is a Cuttlebug folder.
The good thing is I don't have to stamp Merry Christmas. LOL.

Cuttlebug Altered Pink card


This is another card I have designed myself. I have used the little bought card and put it through the cuttlebug ( with love) and sanded it lightly.
It is matted on pink Bazzill which is then matted on silver cardtock from SALT. The silver has been bugged with the border embossing folder that is now a little sick. I broke it in half by trying to do something different that didn't work anyway. BOO HOO. I liked the border and will try and fix it.
Notice the way I have folded the back to stand up.

Monday, December 01, 2008

Cuttlebug Inspired Card-side view


As you can see I have made a few folds on the base ( like the TACO add in Australia) so it can sit upright and not fall flat after a while.

Cuttlebug Inspired Card


This card I have done on gold metallic cardstock and using the border folders I did them diagonally to emphasise the square cardstock. The card in the centre is a gift card that i bought and altered by running the bottom part through the BUG and I lightly sanded it. The gold cardstock is single sided so the message etc goes inside the pre-bought little card on the front.When i upload the next photo it is a sideways view that shows you how the card stands up.
I designed this myself so please if you copy it in any way would you acknowledge where it comes from. Thanks.

An Inspiration.

The following lots of cards the next few days have been inspired by my friend in USA, Rita Loyd. I didn't think to alter used cards or bought cards. So this year when Christmas is over I will not be throwing all of them out. However, I needed to go and buy some so i could do these next projects. I bought small and larger ones for the next lots of cards.
Go and check out Rita's blog and see what marvellous things she does with used cards.
Thank you Rita for your inspiration.

Elissa Rose

In loving memory of my granddaughter Elissa Rose
31-5-31-5-09