Tuesday, February 23, 2010

Sympathy Card


It is hard to make a sympathy card for somebody. Choosing the right colours and words often leaves me sitting and thinking. You cannot go wrong with black, white and or red.

PRODUCTS USED
SALT cardstock
Cuttlebug hearts folder
Cuttlebug
Sentiment and lace source unknown
Charcoal Versa Color Ink
Basic Grey Blitzen Paper
Flower punch
Gold Kindy Glitz

Monday, February 22, 2010

Melanie's Garden.


Look at this lovely flower I photographed in Melanie's Garden.

Friday, February 19, 2010

Jessica's 7th Birthday Party


Here are some more photos from Jessica's 7th Birthday Party. I think Chloe had just as much fun as everybody else. She loved the food and the presents and all the activities. She is such a little character. Jessica had a ball.

Cupcake flowers


Mt friend Libby made these cup cake flowers and they are featured on her blog. She also demonstrated them at my crop last weekend. Here are the links to her blogs and they show you how to make them.
PRODUCTS
SALT cardstock
Olive Versafine Ink
Kaisercraft stamps
Blue and pink cupcake papers.
Brad
Ribbon unknown source
Cuttlebug
Roses Embossing Folder

Thursday, February 18, 2010

Jessica's 7th Birthday Party


Melanie went to a lot of trouble to make Jessica's Birthday afternoon tea special for her 7th birthday. These cup cakes were so yummy. The birthday cake was also. The icing was delicious. She even bought a tea set that she served orange drink in. The sugar bowl had marshmallows in it. We all had a great time especially Jessica and Chloe who likes to be in the thick of things.

Butterfly Birthday Card


I made this card for Jessica's 7th Birthday. Cuttlebugs make the greatest cards, especially if you like texture.

Products
SALT cardstock
Kaisercraft Wooden Stamps. Olive Versafine Ink
Christmas Stars Embossing Folder
Cuttlebug
Chrystallina Kindy Glitz
Hero Arts Butterfly Stamp
Notice the Butterflies have been cut out and only glued down the middle and the wings have been moulded into shape.

Tuesday, February 16, 2010

Distressed Flowers


This shows the distressing tool I used.

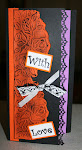
These distressed flowers were fun to make.
PRODUCTS USED
SALT white cardstock
Bazzill lemonade cardstock
Making Memories double sided paper
Foam Stamp
Brads and Ribbon
Cuttlebug
Pyjama Stripes embossing folder
Distressing Tool
Method
Flowers
Cut 4 rectangles of chosen width and length
Distress the edges with the tool
Fold the ends inward half way.
Layer the petals on top of each other.
Brad them together.
Puff the petals out by squeezing the ends.
This card has 2 different sizes.
Leaves
Draw leaves on the back of the cardstock.
Distress the edges
Shape with your fingers.
Twirly Bits
Cut a length of cardstock as thin as possible.
Twirl it around a tooth pick and then take the tooth pick out.
Glue it in place.

Wednesday, February 10, 2010

Mushy Gushy Valentine

The Pink Elephant Challenge #53

Here is a Happy Valentine's Day Card. I saw This idea in Cardmaking, Stamping and Papercraft Magazine by Greg Sukendro. I loved the cut paper that has been twisted. So I have made mine white and gold.
PRODUCTS USED
SALT white and gold cardstock
Cuttlebug and folder-little hearts.
Ribbon and best wishes unknown source.

Wrapping Paper Card--


The only difference between this card and the previous ones is the pleated fabric on the bottom of the card. I have used tape to pleat the fabric onto the card. I also made the bow out of the same fabric. These cards are so quick and easy to do and so much fun.

This card can be for a wedding, engagement or Valentine's Day.

Tuesday, February 09, 2010

Timber Town-Not working Toilets.


Cropworks Crop

I am holding a crop this weekend at Beaumont Hills. It is on Saturday all day. Cardmakers and scrapbookers welcome. If you want to know more e-mail me roseannemon@yahoo.com

We are a great friendly bunch of ladies. I do lessons and demonstrations. We all have a wonderful time.

Wrapping Paper Card-

A close up showing the embossed image.
With Valentine's Day looming I thought I would make a few cards to celebrate the day. Not that I will get any myself.
I love embossing wrapping paper. This is especially good for cards. Because wrapping paper has a white back when you sand it the embossed part appears white. It makes the image stand out.

Monday, February 08, 2010

Port Macquarie

This was taken after a long walk. I look worn out but I wasn't. The Pacific Ocean in the background.
There was this fantastic walkway along the coast through bush land and also rocks etc. I loved the fresh air here. Getting out and walking in nature is so refreshing.

I love lighthouses. They are all so different. This one blended in with the sky.

These photos were taken when Brian and I went for a walk along the coast one day. It was overcast and raining most days but we still managed to get out and about.

Wrapping Paper card


Once again I have been playing with wrapping paper and putting it through the Cuttlebug and lightly sanding it. I have inked it with Olive Versafine ink and used a Kaisercraft wooden stamp for the sentiment. I have used the small hearts embossing folder for the background on the card and the wrapping paper.

Sunday, February 07, 2010

school days

Click to play this Smilebox greeting: school friends
Create your own greeting - Powered by Smilebox
Make a Smilebox greeting

Saturday, February 06, 2010

Paper Twirling


I have wanted to do this for a long time but haven't had time. There are some cool ideas for it.

PRODUCTS USED
SALT cardstock
Kaisercraft Patterned Paper
Kaisercraft wooden stamp
Punch in 2 sizes for flowers
Kindy Glitz
Olive Versafine Ink
Martha Stewart Punch

Wednesday, February 03, 2010

New School Position

I definitely would not have lasted 35 years in the teaching service if I had of followed these rules.

No fancy flush toilets for the kids back in the early days. Imagine the smell!
Check out the classroom. No computers in this room for the kids.
School's in kids. Me ringing the school bell.

I have gone back in time. Check out my new school. This is what small country schools in Australia in the 1800s and early 1900s looked it.

Pink and Black Page 2


This is page 2 of the Pink and Black pages of the Circle Journal I am participating in.

PRODUCTS USED
SALT cardstock
Charcoal Versa Color Ink
Black Versafine ink
Kaisercraft Wooden stamp
Cuttlebug and border folder
Foam heart stamp unknown source

Tuesday, February 02, 2010

Pink and Black Page


I have just noticed the difference in the pinks. One was taken with a flash and the other without it. Amazing.

Anyway here is a Circle Journal page that I am in and I had to do something in pink and black.I wanted to try the flowers from cupcake cases that Libby featured on her blog. See her versions by clicking on the link here. Flowers from Cup Cake Cases Libby has made a fantastic job of these.
I have bugged the black background and the cake cases. the hearts are stamped from a foam stamp of source unknown.

Monday, February 01, 2010

Timbertown Wauchope


I loved this "bush cubby" at Timbertown ,Wauchope near Port Macquarie. Brian and I went there for the day and had a fantastic time looking around. Life in Australia was harsh and a hard way of life back in the 1800s. I am sure glad I wasn't around then.

Cuttlebugged Paper Bows


Paper Bows

1. Cut 3 rectangles any width you wish.
2. Cut them proportionally lengthwise. Each rectangle is shorter than the other.
3. Cuttlebug each rectangle and then lightly sand.
4. Fold each rectangle towards the middle making sure you have a bow shape at the ends.
5. Layer each rectangle on top of each other and secure in the centre with another rectangle.
Flower
This flower was made from 2 punched stars layered on top of each other. The petals were curled upwards.
Products Used
SALT cardstock
Patterned paper unknown source
Kaisercraft wooden stamp
Charcoal Versa Color Ink
This card is actually single layered and is a postcard card for Valentines Day.

Elissa Rose

In loving memory of my granddaughter Elissa Rose
31-5-31-5-09