Wednesday, October 29, 2008

Cuttlebug Odd shape card


Another card designed by me and using the Cuttlebug. This folder has so many uses from background to buttons and in this case flower centres.
I popped up the sentiment stamped by using Kaiser Stamps.

Cuttlebug With Love Card


Just a plain card made using the Cuttlebug.

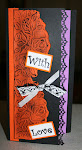
I emossed the cardstock and the title using the Bug.

The ribbon is from Finishingtouch ideasa nd the flower is from SALT.


This rose I bought just after my Father died. I planted it and whenever it blooms I think of my Father.

I chose red because it is one of my favourite colours and I have always loved red roses.


In Memory of my Loving Father Kenneth Cox whom I miss every day of my life. I cannot believe it has been 9 years since he went to Heaven. He was a wonderful man to so many people and I wish he was still here to laugh and talk to. One day we will meet up again but until then I have my wonderful memories. I love you Father.

Ken died on 27-10-1999.

Cuttlebug patterned paper and chipboard


This is the second page of the double layout I did of my first day in Melbourne holiday with Dave and Ros.Not only did I Cuttlebugged the chipboard but I put the patterned paper through so it all tied in.

Cuttlebug chipboard


These photos were taken on one of my many holidays down to Melbourne to visit my good friends Dave and Ros. This holiday will always remain special to me because it was the last time I had wonderful memories of Dave before his health began to deteriorate.We laughed together and went on a few car drives around Melbourne and surrounds.

Cuttlebug chipboard close up


These are a few of the chipboard pieces I put through the Cuttlebug and embossed after I had painted them. I then inked around the edges of the corner and hearts.
I painted the chipboard with Gesso first then when it was dry painted over it with Kaiser paint, Candy. The Gesso is good to use on raw chipboard as it allows the paint to adhere better and I only had to do one coat of Candy paint.


THis layout of Cooper was done at the crop I organised at Pecky's on Saturday. The stamps are Keiser Stamps and the inked stars are from SALT.


The cover was made from white paper that I tie-dyed using a pipette and watered down paint. This is such a cool technique as you never get the same pattern twice.


THis is another version of the mini album using cardstock weight double sided patterned paper.


I made it using a single sheet of cardstock. The folding and cutting lines are easily seen in the above photo. I made the caovers from chipboard covered in patterned paper.. So easy. This is my birthday book.


Everybody who knows me in the scrapbooking world knows how much I love mini-albums. I am always making them or designing them. Here is one I did earlier this year. I didn't design this one but saw it in a book making book.

What a week. Everybody in my family has been sick. Thanks Cooper for bring the bug home.I am so over washing sheets etc.

Yesterday after school I stayed back and did a lesson on making sweets. It was fun but you need patience. Something I do not have. i like it done now but with sweet making you need to wait until it reaches a certain temperature. This is something I will do when I retire. We made Russian Caramels, Honeycomb and Pepermint Lollies.

Wednesday, October 22, 2008

Cuttlebug already texture paper.


Textured cardstock can also be put through the Cuttlebug. It tends to flatten some of the areas which adds dimention. I inked the centre of the flower and Kindy Glitzed it.

Cuttlebug Vellum


Vellum is great to put through the Cuttlebug. It can also be inked and chalked if you wish.

Cuttlebug transparencies


This card was made by putting a transparency through the Cuttlebug. I also used some Staz -On to highlight the centre of one of the flowers.

Cuttlebug patterned paper and sanded


Using patterned cardstock and sanding. Flowers are from Cropworks and cardstock and patterned paper.

Monday, October 20, 2008

Cuttlebug corrugated card


I Cuttlebugged some corrugated card and then used Tim Holtz crackle paint in the centre of the flower. I also used a stencil from The Crafters Workshop to do the edge that I cut out.

Friday, October 17, 2008

Cuttlebug layouts


This layout was also based on a Pagemap design from the September range. I didn't have 4 photos so only did 3. I also used the Kaiser stamp for the circle and The Crafter's Workshop stencil for the border. I Cuttlebugged the photo in the centre with the border embossing folders.

Cuttlebug layouts with photos


This is a Pagemap design from September. I love these designs. I based this layout on this map. As you can see I have Cuttlebugged some of the photos and used the ones shown in previous posts.

Thursday, October 16, 2008

Cuttlebug photos plain and sanded


One of the Cuttlebug borders was just what I wanted to say it all. Jessica loves her little sister.By sanding the one on the left I got the raised bit as white and it stands out. I didn't sand the one on the right and it blends in with the photo. Sometimes you don't want the words to be obvious.

Cuttlebug positive and negative borders on photos


I really like this border. You will notice I did the raised and the indented on the borders. When I sanded the raised border I got white on the raised part. When I sanded the indented border I got white around it and the indented part still stayed the original colour. Once again some orange came into it when I sanded it.

Cuttlebug whole photo but sand around the background


This is Cooper and I embossed the whole photo but only sanded away from his face. This technique is good if you have a slightly blurred photo but still want to use and keep it. Once again by sanding it I got orange in the photo which matched in with Cooper's shirt.

Cuttlebug part of photo with border and sanded.


Me with Chloe again. Like the previous photo I used the boarder Cuttlebug folders to do the embellishments on my photo. I then sanded it. By sanding away at the colour and not going all the way through it leaves another colour. if I sanded more I would have got white. I like this effect as it brings in other colours.

Cuttlebug photo with borders, sanded and inked


I've been playing with the Cuttlebug again. This time trying to be creative. I know this technique will not be for everyone but I had fun with it and I have since used some of the photos in a layout which I will share soon. One side is Raised and the other inverted. I sanded the edges of the photo and the embossed part also. I then shaded with Tim Holtz Distress Ink in orange and green.
Not a good photo of me so embossing it takes away from me. I am nursing Chloe.

Wednesday, October 15, 2008

Cuttlebug metallic cardstocka nd sand


Just an easy put together using SALT Metallic cardstock through the Cuttlebug and slightly sanded.Finishingtouch ribbon that Cropworks sells and scraps. Plus Kindy Glitz.

Cuttlebug painted paper close up


Some close ups of the same card.
Around the edge of the card i used 3D Kindy Glitz.

Cuttlebug creditcard painting technique and metallic dragonflies


I love this card. Firstly I did the background using 2 Kaiser paints and using the creditcard paint technique. Then when it was dry I put it through the Cuttlebug. I used a Gold Dabber I got from Cropworks and highlighted the raised bits. The "with Love" was embossed using the Cuttlebug borders and inked in Versa Gold. The dragonflies were punched from SALT Metallic cardstock and lightly sanded. I used Kaiser pearls to highlight the dragonflies.
I love Dragonflies.

Cuttlebug close up of Christmas serviette


This is a close up of the same card showing how the serviette fits snuggly over the embossed card underneath.

Cuttlebug Christmas serviette technique


Here is a Christmas card I did the same way as the previous 2 posts but with a different Cuttlebug folder. This time the Holly.
I inked over the card with red Versa Ink and then gold. The ribbon is from Cropworks and the stamp is Kaiser Christmas Stamps.

Cuttlebug rose serviette technique


I like this one especially since roses are my favourite flower and red ones at that.

Here is how I did the card below and the one that will appear above soon.

1. I put a piece of cardstock through the Cuttlebug.
2. I Gel Mediumed it to the card.
3. I pulled the bottom 2 layers from a serviette and Gel Mediumed it to the textured card.
4. I then used a Versa Cube to swipe ink over the raised parks that are under the serviette.
5. Then decorated it.

Cuttlebug serviette and inking technique


This is a technique I played with last night while watching Packed to the Rafters. One of the few shows on TV I enjoy.

Sunday, October 12, 2008


Chloe's first time with chocolate and she loved it. The chicken wanted some too. Melanie, Jessica, Chloe and I sat int he backyard each day in the sun and had either afternoon tea or morning tea or lunch. It was so relaxing. The chicken hung around all the time.


The girls both loved the swings. Jessica is being a great big sister by pushing her little sister. I had a lot of fun with the 2 girls at the park and it was delightful to see them enjoying themselves.


I took Jessica and Chloe to the park on the 2 days I was at their place. Jessica and Chloe loved the park. Our little poser.


After swimming lessons we went to feed the ducks. This photo of Jess is also well posed by her and it looks like the fountain is spraying out of her arm.Pink is Jessica's favourite colour.


Jessica at the pool while Chloe was having swimming lessons. Jessica knows how to pose for the camera.


Here he goes again. Cooper lining his cars up in order and all facing the same way.We had to dry off our campervan in the backyard and Cooper never misses an oportunity to play with whatever he can. How cute is he witht he screwed up nose.

Cuttlebug using colorcordinations and metallic words


This card was done using 2 folders. The background was the holy Folder done on Codinations cardstock and sanded to show the pink through. The silver was done on metallic cardstock from SALT and the words were cut out and PEACE was popped up.

Cuttlebug and cordinations sanded


This card was done using the Christmas folder and colorcore cardstock by Cordinations. When you sand this cardstock another colour comes through and in this case it was a pinkish colour. I used the Kaiser Stamps for the words.


This card was done with the heart folder and then inked using the Versa Cubes one row at a time. I just swiped the inks over the row of hearts and each row it didn't matter if the colours overlapped in parts. It adds interest to the layers. The indented hearts were kindy glitzed with Crystallina and the big hearts were popped up. This was a fun one to do and my 5 year old grandaughter was intrigued with it and wanted to know how I did it.

Elissa Rose

In loving memory of my granddaughter Elissa Rose
31-5-31-5-09